



A PVC check valve lets liquid flow in just one direction. This automatic valve opens from forward liquid pressure and closes right away when flow reverses. Important pipe systems use this protection to keep upstream pumps and equipment safe from sudden dirt and damage. Choosing the wrong valve causes loud water hammer, broken seals, and sudden pump failure.
Good liquid control stops expensive pipe damage and lowers regular repair costs. You need to choose strong pipe parts to stop backward flow in heavy-duty business or factory systems. TANGGONG VALVE makes approved check valve options that meet tested safety standards. Fitting a well-made check valve guarantees safe use, steady pressure, and long-lasting pipe performance.
Key Takeaways
-
Select swing valves for fast water flow and pick spring valves to prevent noisy pipe sounds.
-
Put spring check valves in upright pipes so the valve shuts fully when liquid flows through.
-
Install check valves on straight pipe sections far from elbows to keep liquid flowing smoothly.
-
Wait for the exact pipe drying and hardening times before checking your new check valve for leaks.
-
Check your check valves every six months to clean out stuck dirt and help your system last longer.
PVC Check Valve Types and Selection
Comparing Swing, Ball, and Spring Designs
Picking the correct check valve design for your pipes is very important. Each inner design changes the flow rate, speed, and pressure loss in different ways.
Swing models use a top hinge setup. This swinging door swings fully out of the way, giving a swing check valve big flow capacity and low flow resistance. Ball models use a rolling ball inside the main body. This ball blocks the liquid path, so a ball check valve limits your total flow capacity.
|
Design Type |
Flow Capacity |
Water Hammer Control |
Ideal Orientation |
|---|---|---|---|
|
Swing |
Large |
Low |
Horizontal |
|
Ball |
Restricted |
Moderate |
Horizontal |
|
Spring |
Moderate |
High |
Vertical or Horizontal |
A spring check valve relies on an inner spring system. This spring parts lower flow more than a swing style, but it provides a gentle non-slam closing motion. It controls loud water hammer very well and works great in upright pipe paths.
TANGGONG VALVE Standards for Selection
Finding a long-lasting pvc check valve takes careful quality checks. You can shield your pipe system by buying tested parts for backflow control. TANGGONG VALVE builds trusted non-slam spring parts to stop reverse fluid damage.
Experts test every check valve design using high industry rules. TANGGONG VALVE runs API 598 pressure and leak checks on all valve units. Factory lines also obey ISO 5208 testing methods and ISO 15848-1 gas leak protection rules. TUV independent checks confirm total match with safety requirements.
All 3" to 8" swing units carry a pressure rating of 150 PSI at 70°F non-shock.
Setting up a certified check valve guards your gear from sudden pressure spikes. This strong check valve halts backward fluid motion when pumps turn off quickly. Every check valve promises years of use, stopping backflow while keeping steady line flow.
Proper Placement for Check Valve Performance
Horizontal and Vertical Mounting Rules
You must place your check valve correctly in the pipe system to ensure smooth operation. Bad valve positioning messes up liquid movement and ruins pipe seals over time. Regular swing check valve models need horizontal setup because gravity helps the inside disc close right. Installing a normal swing check valve vertically without spring support makes the disc hang open, causing weird performance and seal damage.
A poorly chosen vertical installation can cause more harm than good, potentially leading to flow blockage.
Upright pipe lines need a spring check valve to ensure the door closes completely. Liquid must always flow upward from bottom to top in vertical pipes to help the valve work. Upright setup changes the valve cracking pressure formula, written as Pcrack = (Fspring Wdisc × cosθ) / Adisc, where θ means the travel angle compared to upright position. Upright placement sets θ to 0°, so cosθ equals 1. The full weight of the disc adds directly to the spring force, which raises the pressure needed to open the check valve compared to flat setup.
Straight Pipe Runs and Pump Distance
Rough liquid creates valve noise, hurts inner seal seats, and lowers overall pipe efficiency. You need smooth, steady fluid movement to keep proper backflow prevention across industrial water systems. Always put your check valve on a long, straight pipe section far away from sudden turns or elbows.
-
Keep 5-10x nominal pipe size (NPS) of straight pipe on both the top and bottom sides of the check valve.
-
Place at least 5 pipe diameters of straight pipe right before the check valve to lower flow roughness.
Leave at least 8–12 inches of straight upright pipe between the pump outlet and your check valve to stop rough fluid from ruining inner parts. Following these basic distance rules guarantees steady fluid speed and quiet disc action. Good layout planning simplifies your final check valve installation while guarding expensive top pumps from backflow shock during system shutdown.
Step-by-Step PVC Check Valve Installation
Surface Preparation and Alignment
Cut your pipe ends straight using a real pipe cutter. Clear away sharp edges inside and outside with a deburring tool. Smooth ends shield your seals from harm and help parts line up. Wipe dirt, water, and oil off the pipe exterior and check valve sockets using a dry cloth.
Use a marker to show how deep the pipe goes into the fitting. Push parts together without glue first to check your depth and straightness. Look closely at the arrow printed on the valve body. Make sure this arrow points in the direction your liquid travels. Setting this mark right stops blocked flow and keeps your check valve running well.
Always verify that the flow direction arrow on the check valve body points away from the pump outlet toward the destination.
Solvent Welding and Threaded Connections
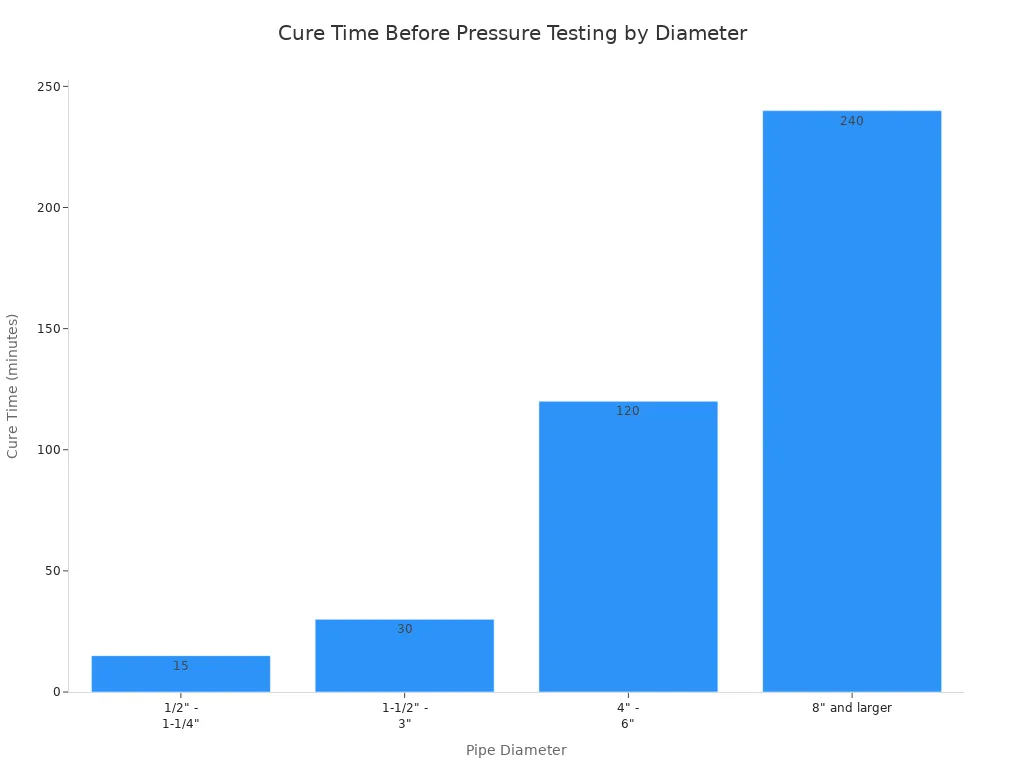
Spread primer on the pipe end and valve socket to soften the plastic. Put on a thick coat of solvent cement before the primer dries out. Slide the pipe all the way in while giving it a quarter turn to spread the glue. Press both parts together hard for 30 seconds so the pipe does not pop out.
|
Diameter Range |
Set Time |
Cure Time (Before Pressure) |
Full Cure Time |
|---|---|---|---|
|
1/2" - 1-1/4" |
30 sec |
15 min |
2 hours |
|
1-1/2" - 3" |
30 sec |
30 min |
4 hours |
|
4" - 6" |
60 sec |
2 hours |
8 hours |
|
8" and larger |
120 sec |
4 hours |
24 hours |
When using threads, wrap PTFE tape clockwise around the pipe threads. Twist the check valve on by hand, then use a wrench to turn it one more full circle. Never overtighten plastic threads or the valve body might crack. Follow these setup steps for a safe build. Always test for leaks under API 598 rules before running the system. Good pvc check valve installation stops quick leaks and guards your pipe system.
Troubleshooting Common Check Valve Issues
Resolving Water Hammer and Valve Chatter
Slow fluid movement makes your valve chatter loudly inside the pipe. When liquid moves too slowly, the inner disc fails to rise completely. This loose disc bounces around, quickly wearing down seals and lowering line pressure. Choosing the proper valve size for your exact fluid volume easily prevents noisy chatter. Soft hinge options use a flexible rubber-covered disc that shortens disc movement to reduce chatter.
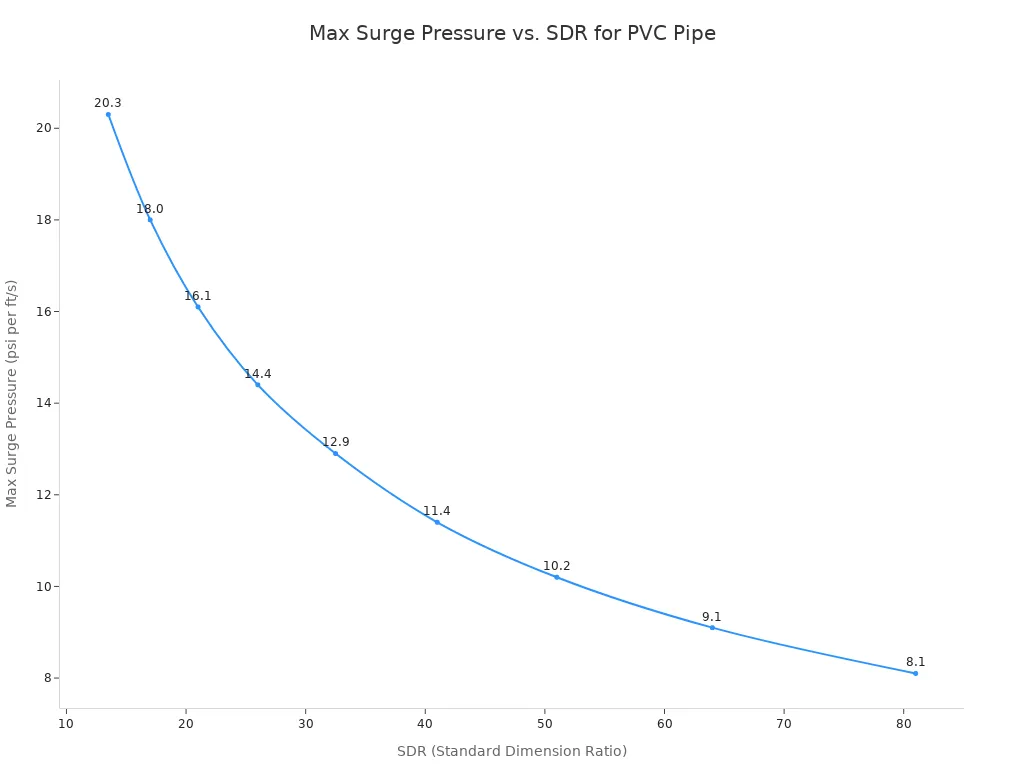
|
SDR |
Maximum Surge Pressure (psi per ft/s) |
|---|---|
|
13.5 |
20.3 |
|
17.0 |
18.0 |
|
21.0 |
16.1 |
High fluid speeds trigger destructive water hammer whenever pumps turn off. Keep regular liquid speeds at 5 ft/s and under 10 ft/s maximum. Adding a spring check valve fixes water hammer problems for good. The spring shuts the disc in a fraction of a second, stopping backward flow before shock waves build up. An axial-flow check valve also defends long pipelines by giving liquids a smooth, clear path.
Diagnostic Maintenance Tips from TANGGONG VALVE
Checking your check valve regularly ensures your entire pipe network operates safely. Schedule routine service every six months to discover minor problems early. Remove trapped dirt and confirm the disc moves freely during every tune-up. Sticking to a simple service plan lengthens overall system life.
Perform a complete check valve pressure test whenever you notice unusual system noise or chatter.
Worn seals need fast check valve fixes to avoid dropping line pressure. Setting up a replacement check valve brings back dependable backflow protection fast. A new spring-loaded check valve costs $50 to $150. Expert labor fees run from $150 to $300, making whole job prices $200 to $450. Doing check valve care on time guards your whole pipe setup against sudden breakdowns.
Picking the right pvc check valve, pointing it the correct way, and keeping pipes straight shields your whole system. Be sure to run full pressure tests on your pipes before turning on any pumps.
Checking your gear every 1 to 2 years shields it from reverse flow damage. Good valves with regular care cost $1,000 to $2,400 over 20 years. Bad valve choices cause sudden breaks that raise expenses to $2,840–$13,200 . Correct setup stops costly shutdowns. Ask TANGGONG VALVE about tested check valve choices for dependable liquid control. Each check valve promises safe performance throughout your whole plant.
FAQ
What is the main difference between a swing check valve and a wafer check valve?
Swing designs use a hinged disc for big flow capacity and low pressure loss. Wafer designs shut faster to lower water hammer. You can pick either model based on your system needs.
Can you install a swing check valve in a vertical pipe?
You can place a swing type in vertical pipes only when fluid moves upward. Gravity helps the disc shut correctly. Still, a spring-loaded pvc check valve works much better for upright setups.
How do you test a valve after installation?
You need to run pressure and leak checks after completing the setup. Standard rules like API 598 help direct these steps. These tests confirm good seals and guard your pipeline equipment before full use.
How often should you perform routine check valve maintenance?
You ought to plan regular check valve care every six months. Simple service removes trapped dirt and checks for easy disc motion. This easy maintenance stops pressure losses and makes system life longer.